How to Replace A Compressor inside of an Air Conditioner.

Ever asked yourself, how do I change a compressor in an air conditioner? Or how hard is replacing a compressor? This is a very good questions so pay attention they will be answered for you right here step by step.

Changing a compressor can be a lot of fun, it will call upon all your mechanical skills from brazing and piping to electrical and wiring. There’s a couple thing’s, which will make this compressor change out go smooth and turn on when you’re done. Whenever you change a compressor you should change the contactor and the capacitor with it and always clear your metering device when the system is open and void.

/S Compressor

1. So as always the first step whenever doing a refrigeration repair, is to recover all the Freon out of the system.

Hook up your digital gauges, recovery tank and recovery machine to the air conditioner.

Now make sure all your ports, nobs and dials are open so refrigerant starts flowing into the recovery tank.

Turn on your recovery machine and let it pull all the Freon out until your suction pressure is down to 0 psi.

2. the air conditioning system is void of refrigerant, unhook your machines and your gauges and pull out both Schrader cores from the suction and the high side access valves.

Now remove the lid from the air conditioner

(Note: To do this you will have to cut or remove the wires going to the condenser motor. Do not forget how the motor is wired as you’ll be putting back how you found it when your all done.)

3. Now pull off the 3 wires going to the compressor C R S from the compressor and from the contactor and capacitor, then throw the wires away you will not be re-using them.

Now use a ½ inch ratchet wrench to loosen and remove the 4 compressor feet bolts.

Turn on your oxygen acetylene torch and heat up both suction line and discharge line at the closest joint to compressor and remove both copper lines.

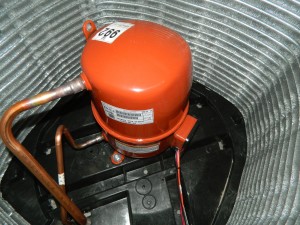
Ok, your compressor is free to be lifted out and removed.

Use a pair of large channel locks in one hand and use your other hand also to grab the compressor and lift it out of machine.


4. Place 4 new rubber feet, which came with the new compressor into the new compressors feet.

Now carefully place the new compressor inside the condenser exactly where the old compressor was.

Install and tighten down the compressor feet bolts with your ½ nut driver or ratchet wrench.

Use sand paper to clean both suction line and the discharge line.

(Note: Always clean your copper well and your job will be much easier.)

5. While you have the machine open and void, get your compressed nitrogen and blow through both lines one at a time to clear out any debris or restrictions that may be.

6. Now you need to replace the filter drier, do not put 2 filter driers into a system If there is no drier at all then find a spot to install one in the 3/8 liquid line. But, if there is already a drier installed in the system, you will remove it and replace it with a new filter drier.

7. Now insert both your suction line and discharge line into the new compressor and with your torches and a stick of 15% silver solder. Braze in the new compressor. If the lines do not reach then re-pipe

Now install 2 brand new Schrader cores into access valves.

8. Hook up your vacuum pump and gauges to the machine and start pulling a vacuum.

You need to allow the vacuum pump to run for 10-15 minutes or until you see the micron gauge drop down to 500 microns then when 500 is reached, close off vacuum pump and turn it off.

So, while you’re waiting for your vacuum to drop, finish the electrical.


9.Replace the contactor now by moving 1 wire at a time from the old contactor to the new one. If you never move more than one wire you will never get lost.

Now replace the capacitor, with a new capacitor that’s the proper uf rating for the new compressor, again one wire at a time.

Now grab your new compressor wires that came in the new box.

Plug the wiring harness into the compressor and run the wires through to the electrical panel.

Wire the new wires as follows:

C from compressor goes to one side of T side contactor and does not get any part of the capacitor.

R from compressor goes to the other side of the T side contactor and also put a second wire from that same point on the contactor to the C terminal on the capacitor.

S from compressor goes straight to the H terminal on the capacitor.

Common or C / to contactor

Run or R / to contactor and jumped to H on capacitor

Start or S / to H on capacitor.

Now that our compressor is wired let’s continue on down matrix.

10. Put the air conditioners lid back on and be aware of the condenser motor wires, run them through to the electrical panel just like they were before and be sure they do not get crimped or pinched anywhere.

Once all your screws are back in the lid.

Go back to your vacuum it’s time to check where we’re at.

By now you should be at or real close to 500 microns.

Once you reach 500 microns close the hose leading to the pump and shut off the vacuum pump.

Let it sit for 15 minutes

While you let the machine sit, you should go through and double check all you’re wiring. C-R-S your capacitor, contactor and the condenser motor. Also verify the motor spins and the blade does not hit anything like wires maybe.

  • After 15 minutes has elapsed if your microns rose above 1000 you have a leak so find the leak fix it and re-vacuum.
  • If you have trouble locating the leak try visiting step 21 for help.
  • If your microns raise some but stopped rising and stabilized below 1000 then you’re ok the rise was just moisture boiling off into a vapor so continue down the page.

Ok, now you’re stabilized below 1000 microns, let’s re-charge the system.

Hook up the recovery jug full of r-22 to the gauges as shown in diagram 8-A open the gauges and tank to allow Freon to flow to the air conditioner. Let it drink all it can and when it stops or slows to the point that it seems pointless. Close down both dials suction and high side on the gauges.

Now put your amp probe onto the common wire for the compressor and turn it on then set it to AAC so we can watch the compressors starting amps.

Plug in disconnect and turn on air conditioner.

The new compressor should turn on and pull less than 3o amps, if it does continue charging. But, if it does not start, go back and find out where you miss-wired the compressor. Or, if it pulls over 30 amps on start, you need to install a hard start kit in step 16.

Now that the new compressor is running were in the clear and home stretch.

You’ll notice the compressor is still low on charge, open your suction gauge to charge the system through the suction only.

 

11. Keep charging through the suction on for 10 seconds and off for 20 seconds until you reach as close to your 10 degrees of superheat, 20-30 degrees over ambient temperatures for the head pressure and as close to 10 degrees of sub cooling as you can get. These are the 3 main points to watch when charging and you will never get them all perfect but, you can adjust some and get the 3 as close as possible. 16-18 degrees of superheat will keep this compressor running for years to come. If you charge wrong here the machine still may work but the compressor will fail years earlier than if you charge right.

If the system is still low on Freon the superheat will be higher than 20 degrees.

Keep adding charge until your superheat drops to as close to 10 degrees as you can get it without putting your sub-cooling over 20 degrees, “give me that 10, 10” I say

If you need more help vacuuming and charging visit page 9 now for more detailed vacuum / charge instructions.

And there it is folks that are how you install, change or replace a bad compressor.

You have good pressures so we know it’s blowing cold air inside, go to end page test now.

Your almost done.

Good job and tell all your friends about “The Repair Matrix” a share or a nice review is all we ask.

By Stephen Gamst

© Copyright Las Vegas Air Conditioning